

Microsoft Edge’s Read Aloud feature can turn text into audible words, allowing you to listen to webpages or documents instead of reading them. This built-in inclusivity tool supports users with visual needs, boosting their accessibility and productivity. This guide will help you learn how to quickly enable or disable the Read Aloud feature in Microsoft Edge via menus or shortcuts.
Methods for enabling or disabling Microsoft Edge Read Aloud
Users looking for hands-free content consumption or IT admins rolling out accessibility tools need to consider this tool in their list for its great benefits.
📌 Use case: This tool is ideal for users with visual impairments or reading difficulties. It can enhance comprehension for long-form text and content accessibility in education or workplace environments.
📌 Prerequisites: Before starting, ensure your device has Chromium-based Microsoft Edge on any edition of Windows 11. To use premium voices, internet access is required, though basic Read Aloud functionality is enabled by default.
We recommend checking ⚠️Things to look out for before proceeding.
📌 Recommended deployment strategies:
| Click to Choose a Method | 💻
Best for Individual Users |
💻💻💻
Best for Enterprises |
| Method 1: Graphical User Interface (GUI) | ✓ | |
| Method 2: Keyboard Shortcut | ✓ | |
| Method 3: Context Menu | ✓ | |
| How to Stop/Close Read Aloud | ✓ |
Method 1: Start the Read Aloud tool using Edge’s GUI
This interface instantly accesses Microsoft Edge’s Read Aloud settings, including voice selection, reading speed, and playback controls.
📌 Use case: This method is ideal for novices or when demonstrating the tool. Use this for on-demand listening without system-wide changes.
- Open Microsoft Edge either by clicking your desktop/taskbar icon or via the search bar.
- Go to a readable webpage (e.g., news, blogs, product pages, etc.), document, or PDF.
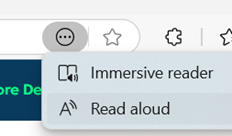
- Click the ⋯ three-dot menu at the right-most part of the address bar.
- Some webpages show a capitalized A symbol.
- Select Read aloud from the menu.
- A playback toolbar immediately appears at the top of the webpage’s content, confirming the feature is active.
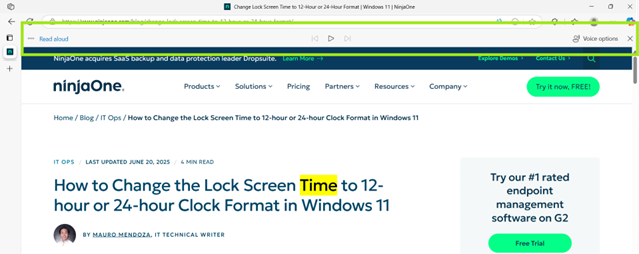
You can now start listening to the content of the page, modifying its voice quality, and select when to play the audio.
Method 2: Start the Read Aloud with keyboard shortcut
This shortcut triggers Microsoft Edge’s underlying text-to-speech (TTS) feature directly without having to open menus for near-instant playback.
📌 Use case: This is ideal for users with mobility limitations or repetitive tasks. You can also use this approach when you need instant activation while coding or multitasking, as well as when the GUI is not working. It activates the same settings as Method 1, so all voice/speed controls remain available.
- Go to a readable webpage (e.g., news, blogs, product pages, etc.), document, or PDF in Microsoft Edge.
- Press Ctrl + Shift + U (or Cmd + Shift + U on a Mac).
The Read Aloud toolbar instantly appears at the top of the page’s content, allowing you to start setting up TTS configuration and listen to the selected text.
Method 3: Start the Read Aloud from the context menu
Unlike full-page reading (Methods 1 and 2), this method focuses only on the selected text.
📌 Use case: This approach is ideal for checking texts without listening to the entire page. You can use this to review API documentation segments, proof-listen critical passages in reports, quickly fact-check during research, and in situations where the Read Aloud can’t work on full pages.
- Go to a readable webpage (e.g., news, blogs, product pages, etc.), document, or PDF in Microsoft Edge.
- Select/highlight a text (a sentence, paragraph, or section).
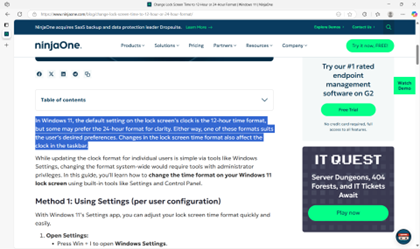
- Right-click the highlighted text, then choose Read aloud selection from the context menu.

Microsoft Edge will immediately read the selection using the default voice, with the playback toolbar automatically appearing above.
How to close or stop the Read Aloud tool
Microsoft Edge treats Read Aloud as a per-tab, session-based feature, closing the toolbar or tab stops it cleanly.
📌Use case: Do this if you want to quickly silence the playback during meetings, troubleshoot it when not working, remove the toolbar from view, or conserve resources on low-memory devices.
There are three ways you can do this:
- Click the X icon on the Read Aloud toolbar in the top-right corner of the page.
- Press Ctrl + Shift + U again (the same shortcut that turns it on).
- Simply close Microsoft Edge or the tab to stop playback automatically.
In all cases, TTS ceases immediately, and the toolbar disappears.
⚠️ Things to look out for
This section highlights potential challenges to keep in mind while following this guide.
| Risks | Potential Consequences | Reversals |
| 1. Accidental activation | Unexpected audio playback in quiet environments (e.g., meetings). | Immediately press Ctrl + Shift + U to toggle off. Train teams on the shortcut. |
| 2. Partial text reading when enabling via context menu | Critical context is missed if text selection is too narrow. | Verify selections before right-clicking. Use full-page reading (Method 1 or 2) for comprehensive content. |
| 3. Resource consumption | High CPU/memory usage on low-end devices during long readings. | Close unused tabs first. Use the X icon to stop playback instead of closing the entire Edge browser. |
| 4. Voice dependency | Premium neural voices fail without internet access. | Set offline-compatible voices (e.g., Microsoft David) in Read Aloud settings beforehand. |
| 5. Toolbar obstruction | Playback controls might block critical UI elements. | Drag the toolbar to reposition it. Use keyboard shortcuts (Ctrl + Shift + U) to minimize GUI interaction. |
Key considerations for using the Read Aloud tool
You can maximize the usage of Microsoft Edge’s Read Aloud tool with these recommended tips.
Voice and playback settings
You can fine-tune its audio output using the toolbar, such as adjusting reading speed, switching voices, or pausing/resuming playback. Changes apply per session, but it resets when disabled.
Language support and offline dependency
The Read Aloud tool has over 40 languages available. These options, however, depend on the voices you have installed and internet access for premium voices. You can enable more languages via Windows Settings > Time & language > Language & region > Add a language.
PDF/ePub compatibility
Read aloud also works seamlessly in Microsoft Edge’s native PDF viewer. Simply open a PDF or ePub in Edge and follow the same procedure as in the methods above. This is ideal for workers reading training manuals or contracts, as well as students, professors, and researchers reading academic papers.
Group Policy limitation
As of Edge update 121, there are no Group Policy or Registry settings to disable or entirely enable the Read Aloud tool. Users can only open or close it per session in Microsoft Edge.
Improve accessibility with Read Aloud in Microsoft Edge
Microsoft Edge Read Aloud seamlessly meshes accessibility and productivity, helping colleagues with visual needs. Use the methods in this guide to access the tool effortlessly. With consistent PDF support, voice customization, and no complex setup, it’s essential for streamlined workflows across IT teams, classrooms, and busy professionals.
Related topics:


